Sunday, March 25, 2012

Whiskey Caramels


Another whiskey recipe. 
I love caramel. I have been known to eat an entire pan/box/jar of caramel in one sitting. (If only there was a caramel eating contest.) These caramels were amazing. They were soft and chewy with out sticking in your teeth, and had just a hint of whiskey. (In the photo they look a little grainy, but they were actually silky smooth.)

Whiskey Caramels
1 cup light corn syrup
1/2 can sweetened condensed milk
3/4 cups milk
1/2 cup heavy cream
1 stick butter
2 cups sugar
1/4 cup plus 2 tsp Honey Whiskey
Sea salt

Butter a 8x8 inch pan.

In a large saucepan, combine corn syrup, condensed milk, milk, heavy cream, butter, sugar, and whiskey. Place over medium heat and stir occasionally until mixture comes to a boil. If sugar crystals are present on the side of the pan, wash down with a wet pastry brush.

Stirring constantly, cook to 250 degrees. Remove from heat and stir in 2 tsp whiskey. Pour without scraping into the prepared pan. Let stand for 10 minutes, then sprinkle with sea salt. Cool at room temperature overnight.

Monday, March 19, 2012

Tollhouse Pie


Hope everyone had a good St. Patrick's Day. I don't really have any Saint Patrick's recipes, but I do have a few good recipes for your leftover Irish Whiskey. 


I have been making Tollhouse Pie (A gooey chocolate chip cookie in pie form.) for years. This recipe from Baked is almost identical to my recipe, except with the addition of Whiskey. As a non-drinker I can say there is no taste of Whiskey in the pie, it just adds a little something extra to the overall flavor.  I love it served warm with a scoop of vanilla ice cream, but it's delicious straight out of the refrigerator the next day too.


Tollhouse Pie
From Baked

9" pie crust (recipe follows)
1/2 cup flour
1/2 cup sugar
1/2 cup firmly packed dark brown sugar
2 eggs
3/4 cup unsalted butter, softened, cut in cubes
1 tbs whiskey
1/2 cup walnuts
1 1/4 cups semisweet chocolate chips


Preheat oven to 350 degrees, with a cookie sheet inside.

In a medium bowl, whisk flour and sugars until combined. Set aside.

In the bowl of an electric mixer fitted with the whisk attachment, beat the eggs on high until foamy, about 3 minutes. Remove whisk attachment and add the paddle attachment. With the mixer on low gradually add the flour mixture. Turn the mixer to high and beat for 2 minutes. Scrape the bowl and add the butter. Beat on high until the mixture is combined. Scrape the bowl, add the whiskey, and beat on high for 1 minute.

Fold in the walnuts and 3/4 cup chocolate chips into the filling.

Pour the filling into the pie shell, and spread evenly. Sprinkle the remaining chocolate chips on the top of the pie.

Bake for 25 minutes, then cover the edges of the crust with aluminum foil and bake for another 25 minutes. 

Pie Crust
Martha Stewart

1 1/4 cups all-purpose flour (spooned and leveled), plus more for rolling dough
1/2 teaspoon salt
1/2 teaspoon sugar
8 tablespoons (1 stick) cold unsalted butter, cut into pieces
2 tablespoons ice water, plus 2 more, if needed
In a food processor, pulse flour, salt, and sugar several times to combine. Add butter. Pulse until mixture resembles coarse meal, with just a few pea-size pieces remaining, 10 pulses. Sprinkle with 2 tablespoons ice water. Pulse until dough is crumbly but holds together when squeezed with fingers (if needed, add up to 2 tablespoons more ice water, 1 tablespoon at a time). Do not overprocess. Turn dough out onto a work surface; form dough into a 3/4-inch-thick disk. Wrap tightly in plastic, and refrigerate until firm, at least 1 hour. Before baking, unwrap dough; place on a large piece of floured waxed paper. Roll dough to a 14-inch round. Using paper, lift and wrap dough around rolling pin (discarding paper); carefully unroll over a 9-inch pie plate. Gently fit into bottom and up sides of plate. Trim overhang to 1 inch; fold overhang under itself. Pinch between thumb and forefinger to make a uniform edge around the rim. Crimp edge; refrigerate until chilled, about 1 hour

Monday, February 13, 2012

Box Of Chocolate Cookies


Last year I made a box of chocolate cupcakes, this year it's cookies. I got the idea for these cookies from My Kitchen Addiction, after a googling Valentine's cookies. They are fairly easy to make, and so cute. A perfect Valentine's gift for a cookie lover.


Shortbread Cookie
From Claire Clark's Indulge
 
225g flour
75g granulated sugar
1 tsp vanilla extract
150g unsalted butter, at room temperature

Preheat oven to 350 degrees. Sift flour into a large mixing bowl and add the sugar. Add butter and vanilla. Using your fingertips, rub the butter into the dry ingredients. When the mixture comes together form into a ball and flatten slightly.
Roll out to 1/2 inch thick, on a lightly floured surface. Cut with cookie cutters and place on parchment lined baking sheet.
Bake for 15 minutes, then rotate the pan and continue baking for an additional 10 minutes. Leave on baking sheet to cool.

Royal Icing
3 oz pasteurized egg whites
1 lb powdered sugar
1 tsp vanilla, plus extra for thinning icing

In a bowl of a stand mixer, combine the egg whites, sugar, and vanilla.
Turn the speed to high and beat until stiff peaks form, about 3 to 4 minutes. 
Separate icing into small bowls for coloring. 
Add color to bowl and mix.
Once desired color is achieved, thin out icing with water and vanilla, a drop at a time. To test the consistency, drizzle a spoonful of icing over the bowl, the ribbon should melt into the rest of the icing in about 4-5 seconds. 
Once the right consistency is reached spoon into piping bags and cut a tiny hole in the tip. 
Cover bowls with plastic wrap when not using, to prevent hardening.
Outline the heart and fill in, letting the icing spread and smooth out. Let dry.
Once the first layer is dry, outline again and sprinkle carefully with red sprinkles. Let dry.
Outline and fill in one "chocolate" at a time. DO NOT decorate chocolates yet. Once all chocolates are in place, let dry.
Now decorate the chocolates with swirls and lines. Let dry.
Outline the chocolates with small dots, again one chocolate at a time. When one chocolate is outlined, carefully connect the dots by dragging a toothpick through each dot.
Let the cookie dry completely.


Wednesday, February 8, 2012

Blueberry Muffins


Valentine's Day is coming, so how about serving someone you love blueberry muffins in bed? I prefer my blueberry muffins more dense, but this recipe makes a lovely light and fluffy muffin, that is quite delicious. Topped with a pat of butter cutout with a heart shaped cookie cutter, and this regular muffin turns into a love muffin (:   (I know, supper cheesy.)


Blueberry Muffins
Slightly adapted from Amy's Bread
(I used ounces for my measurement)

3 1/4 cups flour
1 1/3 cup sugar
1 tbsp baking powder
1 3/4 tsp salt
1 cup butter, melted
3 large eggs
1 1/4 cups milk
1 1/2 tsp orange zest
1 2/3 cups blueberries

Line muffin pan with paper liners. Preheat oven to 350.

In a large bowl whisk together the flour, sugar, baking powder, and salt.

In a medium bowl whisk together butter, eggs, milk, and orange zest.

Add wet ingredents to dry and fold until a few lumps of flour remain.

Gently mix blueberries in a small bowl with a tablespoon of flour, just to coat.

Add blueberries to the muffin batter. Gently fold them in, being careful not to smash any berries, resulting in dingy blue muffins.

Spoon batter into prepared muffin pan.

Bake for 25 minutes.

Saturday, February 4, 2012

Peanut Butter Crispy Bars


These bars are a more decadent version of the Rice Krispie Treats we grew up with. I made these for the super bowl (Yeah they are a little too fancy for guys watching football.), but they would be great for any holiday.
I think a few mini marshmallows mixed into the peanut butter layer would be a nice addition.


Peanut Butter Crispy Bars
From Baked 

For The Crispy Crust
1 3/4 cups Rice Krispies


1/4 cup sugar


3 Tbs light corn syrup


3 Tbs unsalted butter, melted


For The Milk Chocolate Peanut Butter Layer

5 oz milk chocolate, coarsely chopped
1 cup creamy peanut butter

For The Chocolate Icing
3 oz dark chocolate, coarsely chopped
1/2 tsp light corn syrup
4 Tbs unsalted butter

Make The Crispy Crust
Lightly spray a paper towel with nonstick cooking spray and use it to rub the bottom and sides of an 8-inch square baking pan.

Put the cereal in a large bowl and set aside.

Pour ¼ cup water into a small saucepan. Gently add the sugar and corn syrup (do not let any sugar or syrup get on the sides of the pan) and use a small wooden spoon to stir the mixture until just combined. Put a candy thermometer in the saucepan. Cook over medium-high heat and bring to a boil; cook until the mixture reaches the soft-ball stage, 235 degrees.

Remove from the heat, stir in the butter, and pour the mixture over the cereal. Working quickly, stir until the cereal is thoroughly coated, then pour it into the prepared pan. Using your hands, press the mixture into the bottom of the pan (do not press up the sides). Let the crust cool to room temperature while you make the next layer.

Make The Milk Chocolate Peanut Butter Layer
In a large nonreactive metal bowl, stir together the chocolate and the peanut butter.

Set the bowl over a saucepan of simmering water and cook, stirring with a rubber spatula, until the mixture is smooth. Remove the bowl from the pan and stir for about 30 seconds to cool slightly. Pour the mixture over the cooled crust. Put the pan in the refrigerator for 1 hour, or until the top layer hardens.

Make The Chocolate Icing
In a large nonreactive metal bowl, combine the chocolate, corn syrup, and butter.

Set the bowl over a saucepan of simmering water and cook, stirring with a rubber spatula, until the mixture is completely smooth. Remove the bowl from the pan and stir for 30 seconds to cool slightly. Pour the mixture over the chilled milk chocolate peanut butter layer and spread into an even layer. Put the pan in the refrigerator for 1 hour or until the topping hardens.

Cut into 9 squares, or use a cookie cutter warmed in hot water, and serve. The bars can be stored in the refrigerator, covered tightly, for up to 4 days.

Friday, February 3, 2012

Root Beer Bundt Cake


I love root beer, it's spicy flavor instantly takes me back to my childhood. So when I saw this recipe in my Baked cookbook I knew I had to try it.


Before I started the recipe I did a little snooping online, and found that most people couldn't even taste the root beer in the cake. Well, if I was going to make a Root Beer Cake, I wanted to taste the root beer. So not only did I followed Baked's suggestion of replacing a 1/2 cup of root beer with a 1/2 cup of root beer schnapps, I also added a root beer syrup that I found at Williams-Sonoma.


There was no denying that this was a root beer cake, and when it was served with a scoop of vanilla ice cream it became a root beer float. Success!...except I hated it. The cake's texture was great and the frosting was nice and smooth, but the flavor made me gag. My son on the other hand loved it, along with all the people I work with. I guess this cake is for real root beer lovers, and apparently I don't love root beer as much as I thought.


I probably would have liked it more if I would have made the recipe as written, but if you can't taste the root beer why use it at all?  Next time I'm going to replace the root beer with hot chocolate, and make it a Hot Chocolate Bundt Cake.

Root Beer Bunt Cake
Adapted from Baked

For The Root Beer Bundt Cake:
1 1/2 cups root beer
3 tbs root beer syrup
1/2 cup root beer schnapps
1 cup dark unsweetened cocoa powder
1/2 cup unsalted butter, cut into 1 inch pieces
1 1/4 cups granulated sugar
1/2 cup firmly packed dark brown sugar
2 cups all-purpose flour
1 1/4 tsp baking soda
1 tsp salt
2 large eggs

For The Root Beer Fudge Frosting:
2 oz dark chocolate (60% cacao), melted and cooled slightly
1/2 cup unsalted butter, softened
1 tsp salt
1/4 cup root beer
1 tbs root beer syrup
2/3 cup dark unsweetened cocoa powder
2 1/2 cups confectioners' sugar


Make The Root Beer Bundt Cake
Preheat oven to 325 degrees. Generously spray the inside of a 10-inch bundt pan with nonstick cooking spray.
In a small saucepan, heat the root beer, root beer schnapps, root beer syrup, cocoa powder, and butter over medium heat until the butter is melted. Add the sugars and whisk until dissolved. Remove from heat and let cool.
In a large bowl, whisk the flour, baking soda, and salt together.
In a small bowl, whisk the eggs until just beaten, then whisk them into the cooled cocoa mixture until combined. Gently fold the flour mixture into the cocoa mixture. The batter will be slightly lumpy - do not over beat, as it could cause the cake to be tough.
Pour the batter into the prepared pan and bake for 35 to 40 minutes, rotating the pan halfway through the baking time, until a small sharp knife inserted into the cake comes out clean. Transfer the pan to a wire rack to cool completely. Gently loosen the sides of the cake from the pan and turn it out onto the rack. Brush a few tablespoons of root beer syrup over the top of the cake before frosting with the Root Beer Fudge Frosting.

Make The Root Beer Fudge Frosting
Put all the ingredients in a food processor. Pulse in short bursts until the frosting is shiny and smooth.
Use a spatula to spread the fudge frosting over the crown of the bundt in a thick layer.

Monday, January 30, 2012

And The Winner Was....


I was having a hard time deciding what recipe to make next from my Baked: New Frontiers In Baking cookbook, so I wrote up a ballot and had my family vote for the dessert that sounded best to them.
They chose German Chocolate Cake, which surprising I love, even if the filling looks slimy and unappetizing.


Baked's recipe has to be the best German Chocolate Cake recipe I have used so far. The chocolate cake had a rich chocolate flavor and was very moist. The filling was thick, gooey and coconuty, so good you could eat it by spoonfuls. (I might have used a mixing spoon for my spoonful.) The only problem I had with the cake, which really wasn't Baked's fault, was the ganache frosting. Baked says "If you prefer to decorate your German Chocolate Cake with a milk chocolate frosting, let the filling set completely and use the milk chocolate frosting recipe on page 60.", so I did. The frosting was silky and rich, and would be fabulous on a chocolate cake, but it was just a little too much with the German Chocolate filling. To solve the frosting problem, I just ate the cake backwards, and it was divine.


German Chocolate Cake
From Baked

Cake Layers:
2 1/4 cups cake flour
3/4 cup dark unsweetened cocoa powder
1 1/2 teaspoons baking powder
1/2 teaspoon baking soda
3/4 teaspoon salt
1 cup hot coffee (I used Ghirardelli Mocha Hot Cocoa)
1 cup buttermilk
1 1/4 cups (2½ sticks) unsalted butter, softened
2 1/4 cups sugar
5 large eggs 
1 1/2 teaspoons pure vanilla extract
4 ounces dark chocolate, melted and cooled

Filling:
1 1/3 cups shredded sweetened coconut
1 cup sugar 
1/2 cup (1 stick) unsalted butter 
1 cup evaporated milk 
1 teaspoon vanilla extract 
3 large egg yolk
1 1/3 cup toasted pecans, chopped coarsely


MAKE THE GERMAN CHOCOLATE CAKE LAYERS
Preheat the oven to 350 degrees. Butter three 8-inch cake pans, line the bottoms with parchment paper, and butter the parchment. Dust with flour, and knock out the excess flour.
Sift the cake flour, cocoa powder, baking powder, baking soda, and salt into a medium mixing bowl. In a small bowl, whisk together the coffee and buttermilk.
In the bowl of an electric mixer fitted with the paddle attachment, beat the butter and sugar until fluffy. Scrape down the bowl and add the eggs, one at a time, beating until each is incorporated. Add the vanilla and beat to incorporate. The mixture will look light and fluffy.
Add the flour mixture, alternating with the coffee/buttermilk mixture, in three additions, beginning and ending with the flour mixture. Remove the bowl from the mixer and fold in the melted chocolate.
Divide the batter among the prepared pans and smooth the tops. Bake for 30 to 35 minutes, rotating the pans halfway through the baking time, until a toothpick inserted in the center of each cake comes out clean. Transfer the cakes to a wire rack and let cool for 20 minutes. Invert the cakes onto the rack and remove the pans and let cool completely. Remove the parchment.

MAKE THE COCONUT PECAN FILLING
Preheat the oven to 300 degrees. Line a baking sheet with parchment paper.
Spread half of the coconut evenly across the pan and place in the oven for 5 minutes or until the coconut begins to brown. Remove from the oven and cool on a wire rack.
In a large saucepan, stir together the sugar, butter, evaporated milk, vanilla, and egg yolks. Bring the mixture to a boil, stirring constantly. After the mixture begins to boil and thicken, remove from the heat and stir in the toasted coconut, regular coconut, and pecans.
Place the pan over an ice bath (a large bowl filled with ice) and stir the mixture until cool.

ASSEMBLE THE CAKE
Place one cake layer on a serving platter. Trim the top to create a flat surface and evenly spread one third of the filling on top. Add the next layer, trim and frost with one third of the filling, then add the third layer. Trim the top, and frost with the remaining filling.

The cake will keep in an airtight container, at room temperature, for up to 2 days.

Milk Chocolate Frosting:
8 oz bittersweet chocolate, finely chopped
8 oz milk chocolate, finely chopped
1 1/2 cups heavy cream
2 tbs light corn syrup
1 1/2 cups unsalted butter, soft but cool, cut into 1 inch pieces

Place both chocolates in the bowl of an electric mixer. In a small saucepan, bring the cream and corn syrup to a boil, then remove from the heat and immediately pour the mixture over the chocolate. Let stand for 2-3 minutes. Starting in the center of the bowl and working your way out to the edges, whisk the chocolate mixture until completely smooth. Set aside to cool to room temperature.

With the electric mixer fitted with the whisk attachment, on medium speed gradually add the butter pieces and mix until thoroughly incorporated. The frosting should be completely smooth and have a silky look.


Sunday, January 22, 2012

Cookies And Cream Cookies

I love Oreo cookies, and have used them in cakes, cupcakes, truffles, even brownies, but for some reason I have never thought of putting them in cookies. Then on a recent trip into San Francisco I found Anthony's Cookies, and was enlightened.
Typically I skip cookies from bakeries since they are one of the most basic things to bake. Luckily I followed the advice of yelp and went into Anthony's and tried one of every cookie. They were all good, really good, but the stand out was definitely the Cookies and Cream. No chocolate chips, no white chips, just Oreo cookie crumbs, mixed into a basic cookie dough. The simplicity was great, and really let the flavor of the Oreo be the star.
For my Cookies and Cream Cookies, I used a basic chocolate chip cookie recipe and substituted the chocolate chips with chunks of Oreos. They turned out really good, so good, that when I took them to work, Mr. Critique (that guy that will always find something wrong) ate 3 cookies. (He hasn't eaten 3 cookies at one time in his entire life.)  I will have to add this one to the cookie recipe rotation.


Cookies And Cream Cookies

2 1/4 cups flour
1 teaspoon salt
1 teaspoon baking soda
1 1/2 teaspoon cornstarch
1 cup unsalted butter soft but cool
1 cup firmly packed light brown sugar
1/2 cup granulated sugar
2 large eggs
2 teaspoon vanilla extract
16 Oreos, crushed in large chunks

In a large bowl, whisk the flour, salt, baking soda, and cornstarch together and set aside.

In the bowl of an electric mixer fitted with a paddle attachment, beat the butter and sugar together until smooth and creamy. Scrape the sides of bowl and add the eggs, one at a time, beating until incorporated. Add the vanilla and incorporate. Gradually beat in flour mixture.  Using a spatula, fold in the crushed Oreos.

Cover the bowl tightly and refrigerate for 3 hours.

Preheat the oven to 375 degrees.

Spoon dough onto parchment lined cookie sheets, about 1 inch apart. Bake for 12 to 14 minutes.

Tuesday, January 17, 2012

Lemon Lime Bar Parfait

I love the mixing of glasses. The pink and yellow goblets are from the wonderfully tacky Madonna Inn.


What happened? My last two lemon recipes, one from Baked and the other from Momofuku Milk Bar failed. Well, failed my be a little harsh, since they were both still tasty, just not what I had in mind.
The lemon parfaits I made were good. The Vanilla Bean Whipped Cream was extremely delicious. The graham cracker crumbs were graham cracker crumbs. But Momofuku Milk Bar Lemon Filling (I don't call it curd, because hello, I don't eat CURD) was a little salty, and not something to eat on its own. When put all together though, they made a pretty decent parfait, but there was still some room for improvement.
Then there was Baked's Lemon Lime Bars, which tasted extremely delicious. The coconut crust was terrific and I would love to use the recipe for other pies.(Ooh, Chocolate Cream) The Lemon Filling was sweet and tangy.  The problem was that they weren't bars, they were goop, best served in a bowl and eaten with a spoon.
So I think if I made a parfait with the Vanilla Bean Whipped Cream recipe and the Lemon Lime Bar recipe, it would be close to perfection.

Lemon Lime Bar (Parfait)
From Baked 
I am posting the original Baked Lemon Lime Bar recipe with notes on how to turn them into a parfait.

Graham-Coconut Crust (Crumbs)

1 cup sweetened shredded coconut
2 cup graham cracker crumbs (about 15-17 crackers)
2 Tablespoons firmly packed dark brown sugar
1 stick of unsalted butter, melted
 
Lemon Lime Filling
11 large egg yolks
3 large eggs
1 3/4 cups sugar
3/4 cups fresh lemon juice
2 Tablespoons fresh lime juice
2 Tablespoons grated lemon zest
2 Tablespoons grated lime zest
1 1/2 sticks of unsalted butter, softened and cut into small pieces
1/3 cup heavy cream


Graham-Coconut Crust

Preheat the oven to 300 degrees. Butter the sides and bottom of a 9x13 baking pan or spray with cooking spray. 
* For parfaits, skip the greasing of the pan.

On a parchment lined cookie sheet, spread out the coconut. Bake in the oven until golden brown, 7 to 10 minutes. Remove from the oven, toss the coconut, and return to the oven for 3 more minutes.

Put graham cracker crumbs in a large bowl, add the toasted coconut and the brown sugar, and toss with your hands until combined. (I used a fork. I don't like using my hands in food if I can help it, and when I do use my hands I wear vinyl gloves. Just a personal quirk.) Mix in the melted butter. Press the crust up the sides and bottom of the pan in an even layer.
* For parfaits, you don't need to press the crumbs into the pan, just pour in evenly.

Put the crust in the refrigerator for 15 minutes, (I don't know exactly why you need to do this step.) 

Put in the oven and bake for 10 minutes, or until golden brown. Let cool completely. 

 Lemon Lime Filling

Increase the oven temperature to 325.

Put the egg yolks, eggs, sugar, lemon and lime juices, and lemon and lime zest in a large, clean metal pot. Whisk until combined. Cook over medium heat, whisking constantly, until the mixture registers 180 degrees on a candy thermometer, about 10 minutes.

Remove from the heat and whisk in the butter and cream. Pour through a fine mesh sieve directly into the cooled crust. Spread evenly. 
 *For parfaits, pour into a clean 13x9 pan (I don't know about this part, it's just a guess, maybe you can skip it.)


Bake for 8 to 10 minutes, until filling is just set. Let cool to room temperature. Cover with plastic wrap and refrigerate for at least 2 hours. Don't let plastic touch the filling, if making bars.


Vanilla Bean Whipped Cream
From Martha Stewart

2 cups heavy cream
1 vanilla bean
1/4 cup sugar

Chill mixing bowl and whisk attachment. Place heavy cream in a medium bowl. Cut vanilla bean in half and scrape seed into cream. Add the bean to cream and whisk to combine. Cover with plastic wrap and refrigerate for 1 hour.

Strain cream through fine-mesh sieve into chilled mixing bowl. Whisk on medium speed for 1 minute. With mixer running add the sugar. Increase speed to medium high and beat until soft peaks form. Cover and refrigerate for up to 2 hours.


*Prepare the Lemon Lime Bar Parfaits

Prepare the parfaits the day of serving, otherwise the crust will become soggy. 

Spoon the whipped cream into a pastry bag with the tip cut off. In another pastry bag do the same with the lemon filling.

Sprinkle a layer of crust crumbs on the bottom of the parfait glass. Pipe in a layer of lemon followed by a layer of whipped cream. Continue layering until the glass is full, ending with a whipped cream layer. Top with a raspberry and a candied lemon peel.

Saturday, January 14, 2012

Lemon Lemon Loaf

I might have made a mistake by making the Lemon Drop Cake so soon, because it has set the bar extremely high. Unfortunately, this Lemon Lemon Loaf just didn't measure up. Sure it was refreshingly lemony, soft and spongy, and perfectly sweetened, but it just didn't seem as extraordinary as the cake. If only I had made this first, I am sure I would have a different reaction.
Since this recipe did make two loaves, I froze the second loaf and will try it again in a few weeks. Maybe cleansing my palate for a week or two will make me love this recipe more.
I still love Baked though!


Lemon Lemon Loaf
From Baked

Lemon Cake
1 1/2 cups cake flour
1 1/2 cups all-purpose flour
2 teaspoons baking powder
1/4 teaspoon baking soda
1 teaspoon salt
2 1/4 cups sugar
8 large eggs, at room temperature
1/4 cup grated lemon zest (from about 4 lemons)
1/4 cup fresh lemon juice
2 cups (4 sticks) unsalted butter, melted and cooled
1/2 cup sour cream, at room temperature
2 teaspoons pure vanilla extract

Lemon Syrup
1/3 cup fresh lemon juice
1/3 cup sugar
 
Lemon Glaze 
2 cups confectioners' sugar, sifted, or more if needed
4 to 6 tablespoons fresh lemon juice
 
Lemon Cakes
Preheat the oven to 350 degrees F. Spray the sides and bottom of two 9-by-5-by-3-inch loaf pans with nonstick cooking spray. Line the bottom with parchment paper and spray the paper.
Sift both flours, baking powder, baking soda, and salt together in a medium bowl.
Put the sugar, eggs, lemon zest, and lemon juice in a food processor and pulse until combined. With the motor running, drizzle the butter in through the feed tube. Add the sour cream and vanilla and pulse until combined. Transfer the mixture to a large bowl.
Sprinkle the flour mixture, one third at a time, folding gently after each addition until just combined. Do not overmix.
Divide the batter evenly between the prepared pans. Bake in the center of the oven for 20 minutes, rotate the pans, reduce the oven temperature to 325 degrees F., and bake for another 30 to 35 minutes, or until a toothpick inserted in the center of the loaf comes out clean.
Let cool in the pans for 15 minutes.
Lemon Syrup
In a small saucepan over medium heat, heat the lemon juice and sugar until the sugar is completely dissolved. Once dissolved, continue to cook for 3 more minutes. Remove from the heat and set aside.
Line a half sheet pan with parchment paper and invert the loaves onto the pan. Use a toothpick to poke holes in the tops and sides of the loaves.
Brush the tops and sides of the loaves with the lemon syrup. Let the syrup soak into the cake and brush again. Let the cakes cool completely, at least 30 minutes.
(The soaked but unglazed loaves will keep, wrapped in two layers of plastic wrap and frozen, for up to 6 weeks.)
Lemon Glaze:
In a small bowl, whisk together the confectioners' sugar and 4 tablespoons of the lemon juice. The mixture should be thick but pourable. If the mixture is too stiff, add up to another 2 tablespoons lemon juice and whisk again, adding small amounts of lemon juice and/or confectioners' sugar until you get the right consistency. Pour the lemon glaze over the top of each loaf and let it drip down the sides. Let the lemon glaze harden, about 15 minutes, before serving.
The glazed loaves will keep for up to 3 days, wrapped tightly in plastic wrap, at room temperature.

Tuesday, January 3, 2012

Lemon Drop Cake


Lemon drops have a history in my family, banned from my mother as a child and then somewhat unconsciously banned from me as I was growing up. To this day I feel like I am "breaking the rules" when I have a lemon drop. (Sorry Mom, I promise I will be careful)  
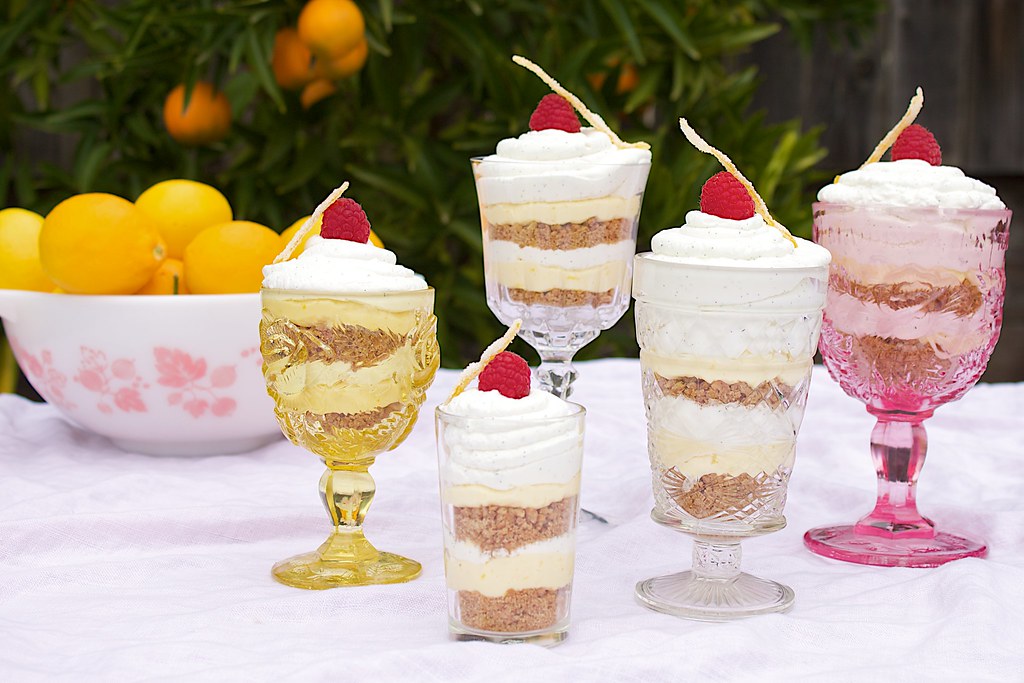
Baked's Lemon Drop Cake recipe was the loophole my family needed, tasting exactly like a lemon drop candy, only in cake form. The frosting is sweet and unassuming, then POW bright tart lemon curd explodes with flavor between the cake layers. AMAZING. This has to be one of the best lemon desserts I have EVER had. (Sorry Aunt L) Not only was it absolutely delicious, it looked beautiful as well. I bet you can guess what dessert I will be bringing our next family gathering (:


Lemon Drop Cake
From Baked

Cake Layers
2 1/2 cups cake flour
3/4 all purpose flour
1 tbs baking powder
1 tsp baking soda
3/4 tsp salt
1/2 cup unsalted butter, softened
1/2 cup vegetable shortening, at room temperature
1 3/4 cups sugar
1 tbs vanilla extract
Grated zest of one lemon
1 large egg
1 1/2 cups ice cold water
3 large egg whites, at room temperature
1/4 tsp cream of tartar

Lemon Curd Filling
3/4 cups fresh lemon juice (from 6 lemons)
Grated zest of 2 lemons
2 large eggs
7 large egg yolks
3/4 cup sugar
4 tbs butter, at room temperature

Frosting
1 1/2 cups sugar
1/3 cup all purpose flour
1 1/2 cups milk
1/3 cup heavy cream
1 1/2 cups unsalted butter, soft but cool, cut into small pieces
1 tsp vanilla extract
1/2 cup lemon curd

Chewy Lemon Head Lemon Drops for decoration


Make The Lemon Cake Layers
Preheat the oven to 325 degrees. Butter three 8-inch round cake pans, line the bottoms with parchment, and butter the parchment. Dust with flour, and knock out the excess flour.

In a large bowl, sift the flours, baking powder, baking soda, and salt together. Set aside.

In the bowl of an electric mixer fitted with the paddle attachment, beat the butter and shortening on medium speed until creamy, 3 to 4 minutes. Add the sugar, vanilla, and lemon zest and beat on medium speed until fluffy, about 3 minutes. Scrape down the sides and bottom of the bowl, add the egg, and beat just until combined. Reduce the speed to low. Add the flour mixture, alternating with the ice water, in three separate additions, beginning and ending with the flour. Scrape down the bowl, then mix on low speed for a few more seconds.

In a clean bowl, whisk the egg whites and cream of tartar until soft peaks form. Do not over beat. Gently fold the egg whites into the batter.

Divide the batter among the prepared pans and smooth the tops. Bake for 40 to 45 minutes, rotating the pans halfway through baking, until a toothpick inserted in the center of each cake comes out clean. Transfer the cakes to a wire rack and let cool for 20 minutes. Invert the cakes onto the rack, remove pans, and let cool completely. Remove the parchment.

Lemon Filling
In a small bowl, pour the lemon juice over the lemon zest and let stand for 10 minutes to soften the zest.

In a nonreactive bowl whisk the egg, egg yolks, and sugar until combined. Add the lemon zest and lemon juice to the egg mixture and whisk until just combined.

Place your bowl containing the egg mixture over a double boiler. Continuously stir the mixture with a heatproof spatula until the mixture has thickened to a pudding like texture, about 6 minutes.

Remove the bowl from the heat and whisk in the butter until emulsified. Strain the mixture through a fine mesh sieve. Take a sheet of plastic wrap and press it into the mixture and around the bowl so that the curd does not form a skin.

Set the lemon curd aside while you make the frosting. Do not refrigerate the curd unless you are saving it for future use.

Frosting
In a medium heavy-bottom saucepan, whisk the sugar and flour together. Add the milk and cream and cook over medium heat, whisking occasionally, until the mixture comes to a boil and has thickened, about 20 minutes.

Transfer the mixture to the bowl of an electric mixer fitted with the paddle attachment. Beat on high speed until cool. Reduce the speed to low and add the butter, mix until thoroughly incorporated.

Increase the speed to medium high and beat until the frosting is light and fluffy.

Add the vanilla and 1/2 cup of the freshly made lemon curd and continue to combined. If the frosting is too soft, put it in the refrigerator to chill slightly then mix again until it is the proper consistency. If the frosting is too firm, place the bowl over a pot of simmering water and beat with a wooden spoon until proper consistency.

Assembling The Cake
Refrigerate the frosting for a few minutes until it can hold it's shape. Place one cake layer on a serving platter. Trim the top to create a flat surface and evenly spread about 1 cup of the remaining lemon curd on top. Add the next layer, trim, and fill with 1 cup of the lemon curd, then add the third layer and trim. Crumb coat the cake and refrigerate for about 15 minutes. Frost the sides and the top of the cake with the frosting. Garnish with the candies and refrigerate for 15 minutes to firm up the finished cake. Store in the refrigerator for up to 3 days.

Sunday, January 1, 2012

Sour Lemon Scones


I'm loving the Baked cookbook I got for Christmas, they have so many delicious looking recipes that I can't wait to try, but for now I am still trying to use up all my lemons.
This recipe for Sour Lemon Scones went along with my previous recipe of Candied Lemon Peels, so it only made sense to make them next. (I didn't even notice this recipe until after I made the lemon peels)
Let me start off by saying the word sour in the title is a little misleading, I love sour and these by no means were sour. They were quite tasty though, a perfect balance of sweet and salty, with just a bit of lemon.  I liked them so much I made myself sick after eating 3 (Yes 3!), for breakfast. As I am writing this, dressed in my workout clothes, I am trying to keep myself from going into the kitchen and eating the last scone. It's made with fruit so it would be "fuel" for my workout, right  (:

You really should go and get the Baked cookbook, but until you do....

Sour Lemon Scones
Slightly adapted from Baked

4 cups all-purpose flour
1/2 cup sugar
1 tablespoon baking powder
1/2 teaspoon baking soda
1/2 teaspoon kosher salt
1/2 teaspoon ginger
1 1/2 cups (3 sticks) unsalted butter, cubed and cold
1 large egg
1 cup milk
1 tablespoon lemon juice
1/4 cup grated lemon zest (from about
3 lemons)
1/2 cup diced candied lemon peel, recipe from previous post
2 tablespoons raw sugar (I used the sugar at the bottom of the candied lemon peel container)

Preheat the oven to 350 degrees F. Line a baking sheet with parchment paper.

In a small bowl combine milk and lemon juice, set aside.

In a large bowl, combine the flour, sugar, baking powder, baking soda, salt and ginger. Whisk until combined.

Add the butter. Use your fingertips to rub the butter into the flour until the butter is pea-sized.

In a separate bowl, whisk together the egg, 3/4 cup of the milk and the lemon zest. Slowly pour the wet ingredients into the dry ingredients, and then gently knead the dough with your hands until the dough starts to come together. If using, add the candied lemon peel and knead to incorporate. Move the dough to a lightly floured surface. Use your hands to shape the dough into two discs (about 1 1/2 inches in height). Do not overwork the dough.

Cut each disk into 6 wedges. Place the wedges onto the prepared baking sheet. Brush each scone with the remaining milk and sprinkle with raw sugar. Bake in the center of the oven for about 25 to 30 minutes (rotating the baking sheet halfway through the baking time) or until the scones are golden brown.

Transfer the scones to a cooling rack; they can be served slightly warm or completely cooled.

Scones can be stored in an airtight container for up to 2 days.

Candied Lemon Peels


Typically when we have lemons, we juice them and freeze the juice in ice trays, throwing away perfectly good zest and peel. This year, I decided to use as much of the lemon as possible, starting with the peel.
When I was in Mexico last year I tried a chocolate covered candied orange peel. I was a little leery but was assure by the stores owner that it was their best seller. (Isn't there a reason we peel oranges and not eat them whole?) They turned out to be pretty good, with a texture similar to a gumdrop, and a tart and sweet citrus flavor like a candy.
So this time, before juicing the lemons, I peeled them, candied the peel, and covered a few candied peels in chocolate. They turned out perfect, tasting just like a chewy lemon drop. My husband can't even walk past the candy dish without taking one.


Candied Lemon Peels
From Baked: New Frontiers in Baking also at cookstr.com

4 lemons (organic)
2 cups sugar
3/4 cup light corn syrup

Wash lemons thoroughly. With a knife, peel each lemon into large strips, leaving as much white pith as possible behind. Using the knife scrape off any pith remaining on the peel.

Place the peels in a heavy bottom saucepan and cover with 1 cup of cold water. Bring to a boil and strain. Repeat this step three times.

Place peels, 4 cups water, sugar, and corn syrup in a medium sized saucepan. Simmer for 15-20 minutes until the mixture forms a thick syrup and the peels become translucent. Remove from heat and let sit until the syrup has cooled to room temperature.

Remove from syrup and cut into strips and roll in granulated sugar. Let dry overnight on a wire rack. Store in a air tight container.

*Keep the syrup you made, it's great for drinks (mixed drinks or even tea), and I found you can drizzle it over a piece of toasted brioche and it's delicious.

LinkWithin

Related Posts with Thumbnails