Monday, January 30, 2012

And The Winner Was....


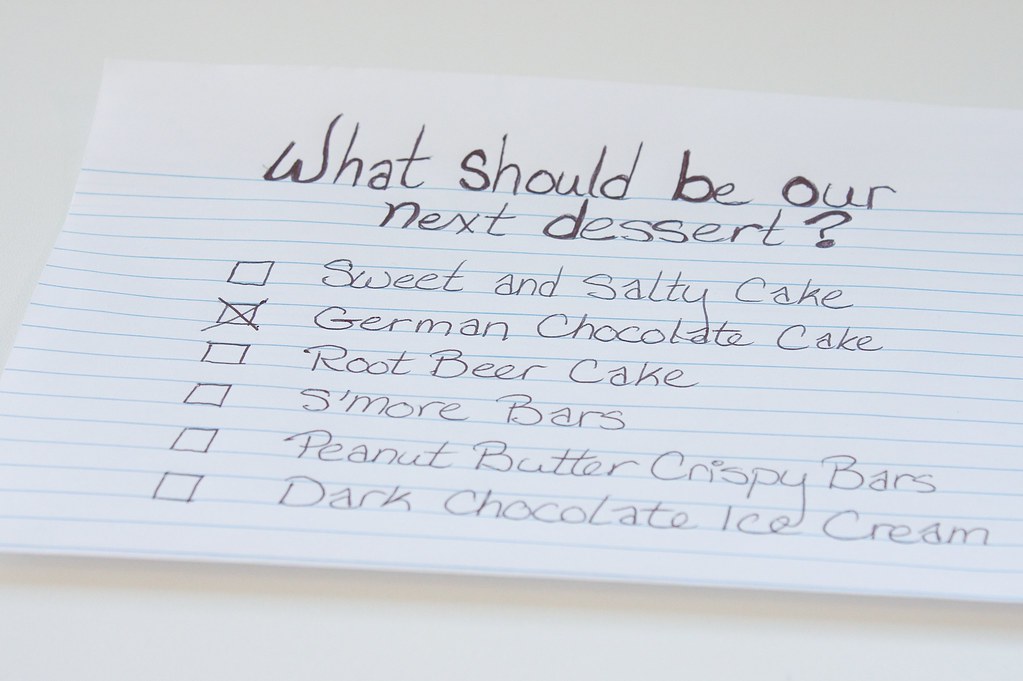
I was having a hard time deciding what recipe to make next from my Baked: New Frontiers In Baking cookbook, so I wrote up a ballot and had my family vote for the dessert that sounded best to them.
They chose German Chocolate Cake, which surprising I love, even if the filling looks slimy and unappetizing.


Baked's recipe has to be the best German Chocolate Cake recipe I have used so far. The chocolate cake had a rich chocolate flavor and was very moist. The filling was thick, gooey and coconuty, so good you could eat it by spoonfuls. (I might have used a mixing spoon for my spoonful.) The only problem I had with the cake, which really wasn't Baked's fault, was the ganache frosting. Baked says "If you prefer to decorate your German Chocolate Cake with a milk chocolate frosting, let the filling set completely and use the milk chocolate frosting recipe on page 60.", so I did. The frosting was silky and rich, and would be fabulous on a chocolate cake, but it was just a little too much with the German Chocolate filling. To solve the frosting problem, I just ate the cake backwards, and it was divine.


German Chocolate Cake
From Baked

Cake Layers:
2 1/4 cups cake flour
3/4 cup dark unsweetened cocoa powder
1 1/2 teaspoons baking powder
1/2 teaspoon baking soda
3/4 teaspoon salt
1 cup hot coffee (I used Ghirardelli Mocha Hot Cocoa)
1 cup buttermilk
1 1/4 cups (2½ sticks) unsalted butter, softened
2 1/4 cups sugar
5 large eggs 
1 1/2 teaspoons pure vanilla extract
4 ounces dark chocolate, melted and cooled

Filling:
1 1/3 cups shredded sweetened coconut
1 cup sugar 
1/2 cup (1 stick) unsalted butter 
1 cup evaporated milk 
1 teaspoon vanilla extract 
3 large egg yolk
1 1/3 cup toasted pecans, chopped coarsely


MAKE THE GERMAN CHOCOLATE CAKE LAYERS
Preheat the oven to 350 degrees. Butter three 8-inch cake pans, line the bottoms with parchment paper, and butter the parchment. Dust with flour, and knock out the excess flour.
Sift the cake flour, cocoa powder, baking powder, baking soda, and salt into a medium mixing bowl. In a small bowl, whisk together the coffee and buttermilk.
In the bowl of an electric mixer fitted with the paddle attachment, beat the butter and sugar until fluffy. Scrape down the bowl and add the eggs, one at a time, beating until each is incorporated. Add the vanilla and beat to incorporate. The mixture will look light and fluffy.
Add the flour mixture, alternating with the coffee/buttermilk mixture, in three additions, beginning and ending with the flour mixture. Remove the bowl from the mixer and fold in the melted chocolate.
Divide the batter among the prepared pans and smooth the tops. Bake for 30 to 35 minutes, rotating the pans halfway through the baking time, until a toothpick inserted in the center of each cake comes out clean. Transfer the cakes to a wire rack and let cool for 20 minutes. Invert the cakes onto the rack and remove the pans and let cool completely. Remove the parchment.

MAKE THE COCONUT PECAN FILLING
Preheat the oven to 300 degrees. Line a baking sheet with parchment paper.
Spread half of the coconut evenly across the pan and place in the oven for 5 minutes or until the coconut begins to brown. Remove from the oven and cool on a wire rack.
In a large saucepan, stir together the sugar, butter, evaporated milk, vanilla, and egg yolks. Bring the mixture to a boil, stirring constantly. After the mixture begins to boil and thicken, remove from the heat and stir in the toasted coconut, regular coconut, and pecans.
Place the pan over an ice bath (a large bowl filled with ice) and stir the mixture until cool.

ASSEMBLE THE CAKE
Place one cake layer on a serving platter. Trim the top to create a flat surface and evenly spread one third of the filling on top. Add the next layer, trim and frost with one third of the filling, then add the third layer. Trim the top, and frost with the remaining filling.

The cake will keep in an airtight container, at room temperature, for up to 2 days.

Milk Chocolate Frosting:
8 oz bittersweet chocolate, finely chopped
8 oz milk chocolate, finely chopped
1 1/2 cups heavy cream
2 tbs light corn syrup
1 1/2 cups unsalted butter, soft but cool, cut into 1 inch pieces

Place both chocolates in the bowl of an electric mixer. In a small saucepan, bring the cream and corn syrup to a boil, then remove from the heat and immediately pour the mixture over the chocolate. Let stand for 2-3 minutes. Starting in the center of the bowl and working your way out to the edges, whisk the chocolate mixture until completely smooth. Set aside to cool to room temperature.

With the electric mixer fitted with the whisk attachment, on medium speed gradually add the butter pieces and mix until thoroughly incorporated. The frosting should be completely smooth and have a silky look.


Sunday, January 22, 2012

Cookies And Cream Cookies

I love Oreo cookies, and have used them in cakes, cupcakes, truffles, even brownies, but for some reason I have never thought of putting them in cookies. Then on a recent trip into San Francisco I found Anthony's Cookies, and was enlightened.
Typically I skip cookies from bakeries since they are one of the most basic things to bake. Luckily I followed the advice of yelp and went into Anthony's and tried one of every cookie. They were all good, really good, but the stand out was definitely the Cookies and Cream. No chocolate chips, no white chips, just Oreo cookie crumbs, mixed into a basic cookie dough. The simplicity was great, and really let the flavor of the Oreo be the star.
For my Cookies and Cream Cookies, I used a basic chocolate chip cookie recipe and substituted the chocolate chips with chunks of Oreos. They turned out really good, so good, that when I took them to work, Mr. Critique (that guy that will always find something wrong) ate 3 cookies. (He hasn't eaten 3 cookies at one time in his entire life.)  I will have to add this one to the cookie recipe rotation.


Cookies And Cream Cookies

2 1/4 cups flour
1 teaspoon salt
1 teaspoon baking soda
1 1/2 teaspoon cornstarch
1 cup unsalted butter soft but cool
1 cup firmly packed light brown sugar
1/2 cup granulated sugar
2 large eggs
2 teaspoon vanilla extract
16 Oreos, crushed in large chunks

In a large bowl, whisk the flour, salt, baking soda, and cornstarch together and set aside.

In the bowl of an electric mixer fitted with a paddle attachment, beat the butter and sugar together until smooth and creamy. Scrape the sides of bowl and add the eggs, one at a time, beating until incorporated. Add the vanilla and incorporate. Gradually beat in flour mixture.  Using a spatula, fold in the crushed Oreos.

Cover the bowl tightly and refrigerate for 3 hours.

Preheat the oven to 375 degrees.

Spoon dough onto parchment lined cookie sheets, about 1 inch apart. Bake for 12 to 14 minutes.

Tuesday, January 17, 2012

Lemon Lime Bar Parfait

I love the mixing of glasses. The pink and yellow goblets are from the wonderfully tacky Madonna Inn.


What happened? My last two lemon recipes, one from Baked and the other from Momofuku Milk Bar failed. Well, failed my be a little harsh, since they were both still tasty, just not what I had in mind.
The lemon parfaits I made were good. The Vanilla Bean Whipped Cream was extremely delicious. The graham cracker crumbs were graham cracker crumbs. But Momofuku Milk Bar Lemon Filling (I don't call it curd, because hello, I don't eat CURD) was a little salty, and not something to eat on its own. When put all together though, they made a pretty decent parfait, but there was still some room for improvement.
Then there was Baked's Lemon Lime Bars, which tasted extremely delicious. The coconut crust was terrific and I would love to use the recipe for other pies.(Ooh, Chocolate Cream) The Lemon Filling was sweet and tangy.  The problem was that they weren't bars, they were goop, best served in a bowl and eaten with a spoon.
So I think if I made a parfait with the Vanilla Bean Whipped Cream recipe and the Lemon Lime Bar recipe, it would be close to perfection.

Lemon Lime Bar (Parfait)
From Baked 
I am posting the original Baked Lemon Lime Bar recipe with notes on how to turn them into a parfait.

Graham-Coconut Crust (Crumbs)

1 cup sweetened shredded coconut
2 cup graham cracker crumbs (about 15-17 crackers)
2 Tablespoons firmly packed dark brown sugar
1 stick of unsalted butter, melted
 
Lemon Lime Filling
11 large egg yolks
3 large eggs
1 3/4 cups sugar
3/4 cups fresh lemon juice
2 Tablespoons fresh lime juice
2 Tablespoons grated lemon zest
2 Tablespoons grated lime zest
1 1/2 sticks of unsalted butter, softened and cut into small pieces
1/3 cup heavy cream


Graham-Coconut Crust

Preheat the oven to 300 degrees. Butter the sides and bottom of a 9x13 baking pan or spray with cooking spray. 
* For parfaits, skip the greasing of the pan.

On a parchment lined cookie sheet, spread out the coconut. Bake in the oven until golden brown, 7 to 10 minutes. Remove from the oven, toss the coconut, and return to the oven for 3 more minutes.

Put graham cracker crumbs in a large bowl, add the toasted coconut and the brown sugar, and toss with your hands until combined. (I used a fork. I don't like using my hands in food if I can help it, and when I do use my hands I wear vinyl gloves. Just a personal quirk.) Mix in the melted butter. Press the crust up the sides and bottom of the pan in an even layer.
* For parfaits, you don't need to press the crumbs into the pan, just pour in evenly.

Put the crust in the refrigerator for 15 minutes, (I don't know exactly why you need to do this step.) 

Put in the oven and bake for 10 minutes, or until golden brown. Let cool completely. 

 Lemon Lime Filling

Increase the oven temperature to 325.

Put the egg yolks, eggs, sugar, lemon and lime juices, and lemon and lime zest in a large, clean metal pot. Whisk until combined. Cook over medium heat, whisking constantly, until the mixture registers 180 degrees on a candy thermometer, about 10 minutes.

Remove from the heat and whisk in the butter and cream. Pour through a fine mesh sieve directly into the cooled crust. Spread evenly. 
 *For parfaits, pour into a clean 13x9 pan (I don't know about this part, it's just a guess, maybe you can skip it.)


Bake for 8 to 10 minutes, until filling is just set. Let cool to room temperature. Cover with plastic wrap and refrigerate for at least 2 hours. Don't let plastic touch the filling, if making bars.


Vanilla Bean Whipped Cream
From Martha Stewart

2 cups heavy cream
1 vanilla bean
1/4 cup sugar

Chill mixing bowl and whisk attachment. Place heavy cream in a medium bowl. Cut vanilla bean in half and scrape seed into cream. Add the bean to cream and whisk to combine. Cover with plastic wrap and refrigerate for 1 hour.

Strain cream through fine-mesh sieve into chilled mixing bowl. Whisk on medium speed for 1 minute. With mixer running add the sugar. Increase speed to medium high and beat until soft peaks form. Cover and refrigerate for up to 2 hours.


*Prepare the Lemon Lime Bar Parfaits

Prepare the parfaits the day of serving, otherwise the crust will become soggy. 

Spoon the whipped cream into a pastry bag with the tip cut off. In another pastry bag do the same with the lemon filling.

Sprinkle a layer of crust crumbs on the bottom of the parfait glass. Pipe in a layer of lemon followed by a layer of whipped cream. Continue layering until the glass is full, ending with a whipped cream layer. Top with a raspberry and a candied lemon peel.

Saturday, January 14, 2012

Lemon Lemon Loaf

I might have made a mistake by making the Lemon Drop Cake so soon, because it has set the bar extremely high. Unfortunately, this Lemon Lemon Loaf just didn't measure up. Sure it was refreshingly lemony, soft and spongy, and perfectly sweetened, but it just didn't seem as extraordinary as the cake. If only I had made this first, I am sure I would have a different reaction.
Since this recipe did make two loaves, I froze the second loaf and will try it again in a few weeks. Maybe cleansing my palate for a week or two will make me love this recipe more.
I still love Baked though!


Lemon Lemon Loaf
From Baked

Lemon Cake
1 1/2 cups cake flour
1 1/2 cups all-purpose flour
2 teaspoons baking powder
1/4 teaspoon baking soda
1 teaspoon salt
2 1/4 cups sugar
8 large eggs, at room temperature
1/4 cup grated lemon zest (from about 4 lemons)
1/4 cup fresh lemon juice
2 cups (4 sticks) unsalted butter, melted and cooled
1/2 cup sour cream, at room temperature
2 teaspoons pure vanilla extract

Lemon Syrup
1/3 cup fresh lemon juice
1/3 cup sugar
 
Lemon Glaze 
2 cups confectioners' sugar, sifted, or more if needed
4 to 6 tablespoons fresh lemon juice
 
Lemon Cakes
Preheat the oven to 350 degrees F. Spray the sides and bottom of two 9-by-5-by-3-inch loaf pans with nonstick cooking spray. Line the bottom with parchment paper and spray the paper.
Sift both flours, baking powder, baking soda, and salt together in a medium bowl.
Put the sugar, eggs, lemon zest, and lemon juice in a food processor and pulse until combined. With the motor running, drizzle the butter in through the feed tube. Add the sour cream and vanilla and pulse until combined. Transfer the mixture to a large bowl.
Sprinkle the flour mixture, one third at a time, folding gently after each addition until just combined. Do not overmix.
Divide the batter evenly between the prepared pans. Bake in the center of the oven for 20 minutes, rotate the pans, reduce the oven temperature to 325 degrees F., and bake for another 30 to 35 minutes, or until a toothpick inserted in the center of the loaf comes out clean.
Let cool in the pans for 15 minutes.
Lemon Syrup
In a small saucepan over medium heat, heat the lemon juice and sugar until the sugar is completely dissolved. Once dissolved, continue to cook for 3 more minutes. Remove from the heat and set aside.
Line a half sheet pan with parchment paper and invert the loaves onto the pan. Use a toothpick to poke holes in the tops and sides of the loaves.
Brush the tops and sides of the loaves with the lemon syrup. Let the syrup soak into the cake and brush again. Let the cakes cool completely, at least 30 minutes.
(The soaked but unglazed loaves will keep, wrapped in two layers of plastic wrap and frozen, for up to 6 weeks.)
Lemon Glaze:
In a small bowl, whisk together the confectioners' sugar and 4 tablespoons of the lemon juice. The mixture should be thick but pourable. If the mixture is too stiff, add up to another 2 tablespoons lemon juice and whisk again, adding small amounts of lemon juice and/or confectioners' sugar until you get the right consistency. Pour the lemon glaze over the top of each loaf and let it drip down the sides. Let the lemon glaze harden, about 15 minutes, before serving.
The glazed loaves will keep for up to 3 days, wrapped tightly in plastic wrap, at room temperature.

Tuesday, January 3, 2012

Lemon Drop Cake


Lemon drops have a history in my family, banned from my mother as a child and then somewhat unconsciously banned from me as I was growing up. To this day I feel like I am "breaking the rules" when I have a lemon drop. (Sorry Mom, I promise I will be careful)  Baked's Lemon Drop Cake recipe was the loophole my family needed, tasting exactly like a lemon drop candy, only in cake form. The frosting is sweet and unassuming, then POW bright tart lemon curd explodes with flavor between the cake layers. AMAZING. This has to be one of the best lemon desserts I have EVER had. (Sorry Aunt L) Not only was it absolutely delicious, it looked beautiful as well. I bet you can guess what dessert I will be bringing our next family gathering (:


Lemon Drop Cake
From Baked

Cake Layers
2 1/2 cups cake flour
3/4 all purpose flour
1 tbs baking powder
1 tsp baking soda
3/4 tsp salt
1/2 cup unsalted butter, softened
1/2 cup vegetable shortening, at room temperature
1 3/4 cups sugar
1 tbs vanilla extract
Grated zest of one lemon
1 large egg
1 1/2 cups ice cold water
3 large egg whites, at room temperature
1/4 tsp cream of tartar

Lemon Curd Filling
3/4 cups fresh lemon juice (from 6 lemons)
Grated zest of 2 lemons
2 large eggs
7 large egg yolks
3/4 cup sugar
4 tbs butter, at room temperature

Frosting
1 1/2 cups sugar
1/3 cup all purpose flour
1 1/2 cups milk
1/3 cup heavy cream
1 1/2 cups unsalted butter, soft but cool, cut into small pieces
1 tsp vanilla extract
1/2 cup lemon curd

Chewy Lemon Head Lemon Drops for decoration


Make The Lemon Cake Layers
Preheat the oven to 325 degrees. Butter three 8-inch round cake pans, line the bottoms with parchment, and butter the parchment. Dust with flour, and knock out the excess flour.

In a large bowl, sift the flours, baking powder, baking soda, and salt together. Set aside.

In the bowl of an electric mixer fitted with the paddle attachment, beat the butter and shortening on medium speed until creamy, 3 to 4 minutes. Add the sugar, vanilla, and lemon zest and beat on medium speed until fluffy, about 3 minutes. Scrape down the sides and bottom of the bowl, add the egg, and beat just until combined. Reduce the speed to low. Add the flour mixture, alternating with the ice water, in three separate additions, beginning and ending with the flour. Scrape down the bowl, then mix on low speed for a few more seconds.

In a clean bowl, whisk the egg whites and cream of tartar until soft peaks form. Do not over beat. Gently fold the egg whites into the batter.

Divide the batter among the prepared pans and smooth the tops. Bake for 40 to 45 minutes, rotating the pans halfway through baking, until a toothpick inserted in the center of each cake comes out clean. Transfer the cakes to a wire rack and let cool for 20 minutes. Invert the cakes onto the rack, remove pans, and let cool completely. Remove the parchment.

Lemon Filling
In a small bowl, pour the lemon juice over the lemon zest and let stand for 10 minutes to soften the zest.

In a nonreactive bowl whisk the egg, egg yolks, and sugar until combined. Add the lemon zest and lemon juice to the egg mixture and whisk until just combined.

Place your bowl containing the egg mixture over a double boiler. Continuously stir the mixture with a heatproof spatula until the mixture has thickened to a pudding like texture, about 6 minutes.

Remove the bowl from the heat and whisk in the butter until emulsified. Strain the mixture through a fine mesh sieve. Take a sheet of plastic wrap and press it into the mixture and around the bowl so that the curd does not form a skin.

Set the lemon curd aside while you make the frosting. Do not refrigerate the curd unless you are saving it for future use.

Frosting
In a medium heavy-bottom saucepan, whisk the sugar and flour together. Add the milk and cream and cook over medium heat, whisking occasionally, until the mixture comes to a boil and has thickened, about 20 minutes.

Transfer the mixture to the bowl of an electric mixer fitted with the paddle attachment. Beat on high speed until cool. Reduce the speed to low and add the butter, mix until thoroughly incorporated.

Increase the speed to medium high and beat until the frosting is light and fluffy.

Add the vanilla and 1/2 cup of the freshly made lemon curd and continue to combined. If the frosting is too soft, put it in the refrigerator to chill slightly then mix again until it is the proper consistency. If the frosting is too firm, place the bowl over a pot of simmering water and beat with a wooden spoon until proper consistency.

Assembling The Cake
Refrigerate the frosting for a few minutes until it can hold it's shape. Place one cake layer on a serving platter. Trim the top to create a flat surface and evenly spread about 1 cup of the remaining lemon curd on top. Add the next layer, trim, and fill with 1 cup of the lemon curd, then add the third layer and trim. Crumb coat the cake and refrigerate for about 15 minutes. Frost the sides and the top of the cake with the frosting. Garnish with the candies and refrigerate for 15 minutes to firm up the finished cake. Store in the refrigerator for up to 3 days.

Sunday, January 1, 2012

Sour Lemon Scones


I'm loving the Baked cookbook I got for Christmas, they have so many delicious looking recipes that I can't wait to try, but for now I am still trying to use up all my lemons.
This recipe for Sour Lemon Scones went along with my previous recipe of Candied Lemon Peels, so it only made sense to make them next. (I didn't even notice this recipe until after I made the lemon peels)
Let me start off by saying the word sour in the title is a little misleading, I love sour and these by no means were sour. They were quite tasty though, a perfect balance of sweet and salty, with just a bit of lemon.  I liked them so much I made myself sick after eating 3 (Yes 3!), for breakfast. As I am writing this, dressed in my workout clothes, I am trying to keep myself from going into the kitchen and eating the last scone. It's made with fruit so it would be "fuel" for my workout, right  (:

You really should go and get the Baked cookbook, but until you do....

Sour Lemon Scones
Slightly adapted from Baked

4 cups all-purpose flour
1/2 cup sugar
1 tablespoon baking powder
1/2 teaspoon baking soda
1/2 teaspoon kosher salt
1/2 teaspoon ginger
1 1/2 cups (3 sticks) unsalted butter, cubed and cold
1 large egg
1 cup milk
1 tablespoon lemon juice
1/4 cup grated lemon zest (from about
3 lemons)
1/2 cup diced candied lemon peel, recipe from previous post
2 tablespoons raw sugar (I used the sugar at the bottom of the candied lemon peel container)

Preheat the oven to 350 degrees F. Line a baking sheet with parchment paper.

In a small bowl combine milk and lemon juice, set aside.

In a large bowl, combine the flour, sugar, baking powder, baking soda, salt and ginger. Whisk until combined.

Add the butter. Use your fingertips to rub the butter into the flour until the butter is pea-sized.

In a separate bowl, whisk together the egg, 3/4 cup of the milk and the lemon zest. Slowly pour the wet ingredients into the dry ingredients, and then gently knead the dough with your hands until the dough starts to come together. If using, add the candied lemon peel and knead to incorporate. Move the dough to a lightly floured surface. Use your hands to shape the dough into two discs (about 1 1/2 inches in height). Do not overwork the dough.

Cut each disk into 6 wedges. Place the wedges onto the prepared baking sheet. Brush each scone with the remaining milk and sprinkle with raw sugar. Bake in the center of the oven for about 25 to 30 minutes (rotating the baking sheet halfway through the baking time) or until the scones are golden brown.

Transfer the scones to a cooling rack; they can be served slightly warm or completely cooled.

Scones can be stored in an airtight container for up to 2 days.

Candied Lemon Peels


Typically when we have lemons, we juice them and freeze the juice in ice trays, throwing away perfectly good zest and peel. This year, I decided to use as much of the lemon as possible, starting with the peel.
When I was in Mexico last year I tried a chocolate covered candied orange peel. I was a little leery but was assure by the stores owner that it was their best seller. (Isn't there a reason we peel oranges and not eat them whole?) They turned out to be pretty good, with a texture similar to a gumdrop, and a tart and sweet citrus flavor like a candy.
So this time, before juicing the lemons, I peeled them, candied the peel, and covered a few candied peels in chocolate. They turned out perfect, tasting just like a chewy lemon drop. My husband can't even walk past the candy dish without taking one.


Candied Lemon Peels
From Baked: New Frontiers in Baking also at cookstr.com

4 lemons (organic)
2 cups sugar
3/4 cup light corn syrup

Wash lemons thoroughly. With a knife, peel each lemon into large strips, leaving as much white pith as possible behind. Using the knife scrape off any pith remaining on the peel.

Place the peels in a heavy bottom saucepan and cover with 1 cup of cold water. Bring to a boil and strain. Repeat this step three times.

Place peels, 4 cups water, sugar, and corn syrup in a medium sized saucepan. Simmer for 15-20 minutes until the mixture forms a thick syrup and the peels become translucent. Remove from heat and let sit until the syrup has cooled to room temperature.

Remove from syrup and cut into strips and roll in granulated sugar. Let dry overnight on a wire rack. Store in a air tight container.

*Keep the syrup you made, it's great for drinks (mixed drinks or even tea), and I found you can drizzle it over a piece of toasted brioche and it's delicious.

LinkWithin

Related Posts with Thumbnails